REMI 3 Prototype Design Notes Author: Michael J. Bauer |
This web post describes the design and construction of the REMI 3 prototype. For a general introduction to this and related projects, see "Introducing the REMI".
REMI 3 "All-in-one" EWI prototype Overview
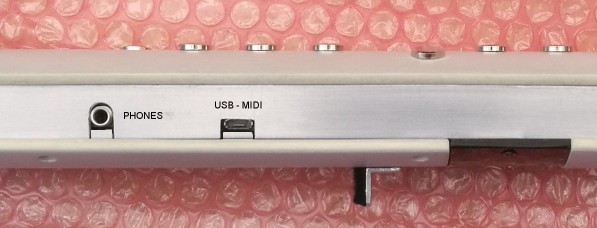
REMI 3 is an "electronic wind instrument" (EWI) using a fingering scheme loosely based on the recorder. This model is fully self-contained, battery-powered with built-in sound synthesizer, audio amplifier and speaker. It also has a 3.5mm headphone socket for private practise and a 1/4 inch phone jack for audio output to an external instrument amplifier. A micro USB connector allows the REMI 3 to be used as a MIDI controller with a virtual synthesizer app on your computer or mobile device. REMI 3 Features
The REMI is not a commercially available product. The hardware design and software source code are in the public domain (open-source). The design may be replicated by suitably skilled electronics hobbyists. Detailed step-by-step instructions and parts lists are not provided. Information published here is intended as a basis on which to design and build your own customized EWI. NB:
Unfortunately, the "Teensy 3.2" MCU module used
in the REMI 3 is no longer being manufactured. However, it
may be still possible to find a Teensy 3.2 module on eBay
or another online marketplace.* If you prefer to make a simpler EWI with MIDI controller operation, but without a built-in sound synthesizer and speaker, consider building the "REMI 2 Handset". The parts are all readily available at low cost. |

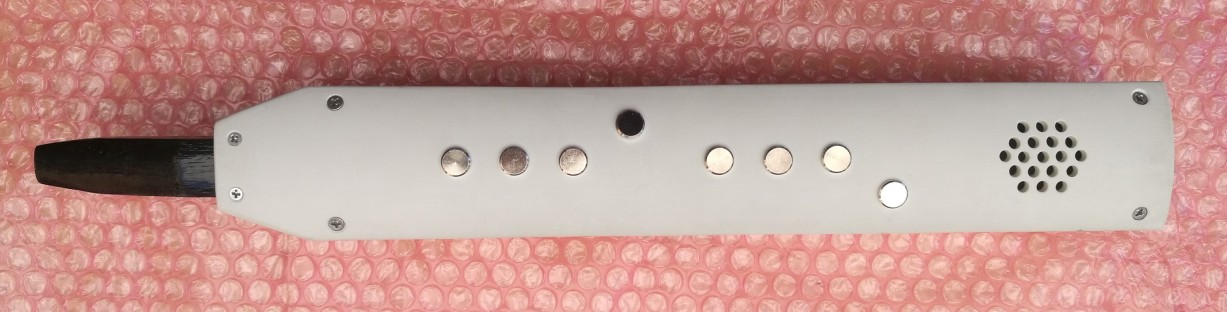
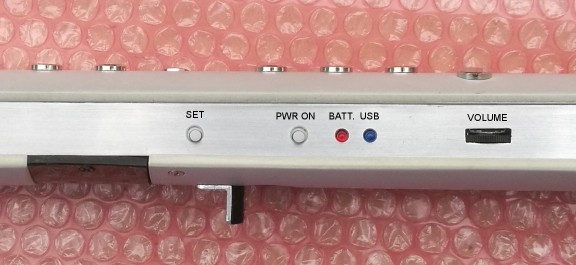
Upper surface has 8 touch-pads and speaker grille.
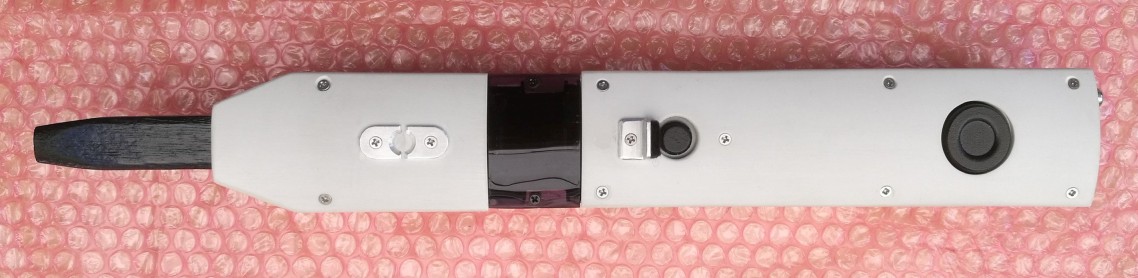
Under-side has 2 octave
pads, OLED graphic display, RH thumb rest & modulation pad
(FSR).
The speaker magnet (Neodymium) protrudes through a round cutout near the bell end.
|
Construction The prototype REMI 3 was made from pieces of PVC plastic cut from a scrap of drain pipe, 110mm outside diameter, 3.5mm wall thickness. Dimensions of the covers: 330mm (L) x 50mm (W). The top and bottom covers are attached to side pieces made from aluminium channel extrusion (16 x 12 x 1.5mm). The touch-pads are "Chicago" screws, 4mm long (shank) x 10mm diameter (head), Nickel-plated. Nylon washers (8mm diam, 4mm hole) and solder lugs are fitted over the shanks on the inside of the cover. Screw heads are inserted into the shanks and tightened.
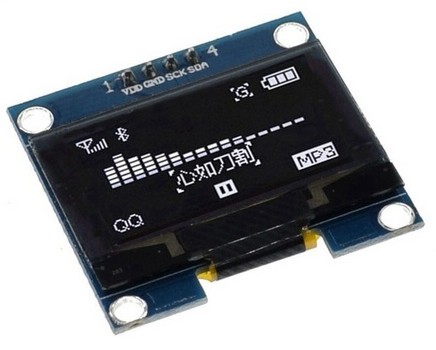
The (temporary) mouth-piece was carved out of wood, finished size 70 x 25 x 30mm (approx). A better idea would be to replace the wooden mouthpiece with a plastic part made with a 3D printer. Ideally, the whole enclosure would be made of plastic parts with a 3D printer. Pictures showing construction detail can be found in the REMI 3 Photo Gallery. Sound Synthesizer The sound synthesizer in REMI 3 is implemented entirely in software. The synth is modelled on classic monophonic analog synth's comprising a pair of oscillators, mixer, variable-frequency resonant filter, variable-gain audio attenuator, envelope shapers, etc. However, the REMI synth soundscape is not limited to that of low-end analog synth's. Where the REMI synth model differs from simple analog synth's -- apart from using digital signal processing (DSP) techniques -- is that the oscillators use wave-table synthesis to generate virtually any desired waveform, hence harmonic content. Further, the oscillator mix ratio can be varied in time (i.e. modulated) according to a variety of control sources, e.g. breath pressure, envelope, modulation pad, LFO, etc. REMI 3 synth core functionality is very similar to the REMI mk2 Sound Module. Player User-Interface A user interface comprising a 1.3 inch OLED graphic display module (128 x 64 pixels), the 10 touch-pads and a 'SET' button (on the RH side panel) allows the player to select a desired instrument preset and to adjust other settings on the REMI 3. Following is a list of player settings supported by the UI...
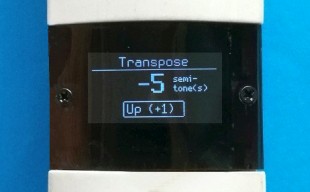
While a note is not being played, a particular combination of touch-pads will select a menu item (usually a settable parameter, as in the above list) for display. The touch-pad selection also determines what action, if any, will occur when the 'SET' button is pressed. In each case, the action of the 'SET' button is indicated in a text box at the bottom of the screen. For example, if pad LH1 is pressed, the menu item shown is "Transpose" and the 'SET' button when pressed will cause the setting to be increased by 1 semitone. If pad LH2 is pressed, the menu item is still "Transpose", but in this case the 'SET' button when pressed would cause the value to be reduced by 1 semitone. If both pads LH1 and LH2 are pressed together, the button action would be to reset the Transpose value to zero. The display is turned off while a note is playing, also if there are no touch-pads being touched. This helps to minimize battery drain when running on battery power. View/download REMI 3 User Manual ___Fingering
Scheme REMI 3 has 8 touch-pads on the upper surface. Four pads are operated by fingers on the left hand and four pads are operated by the right hand. The fourth pad on the left hand (LH4), which doesn't exist on the recorder, serves to sharpen certain notes (e.g. to produce C# and F#). This arrangement, in keeping with other EWI designs, is simpler and more logical than the fingering arrangements on acoustic instruments. 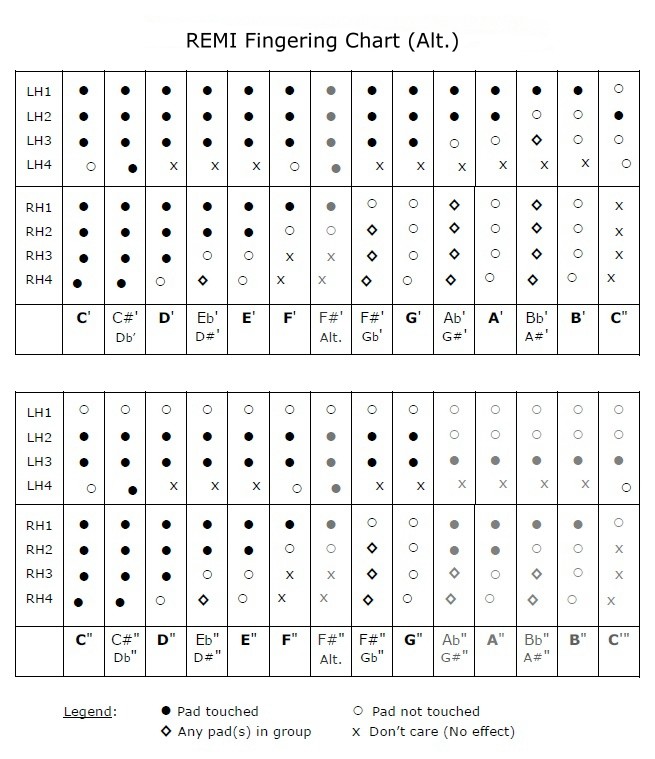 Two pads on
the underside of the handset operated by the left-hand thumb
select one of three ranges of notes, each range being two
octaves, as shown in the chart. The octave pads are located so that one or other or
both
pads together can be touched. When both
octave pads are touched, the "middle" note range is selected
(normally C4 to C6). By moving the
thumb to the upper or lower pad, the range of notes is shifted up or
down by one octave, respectively. The octave
pads
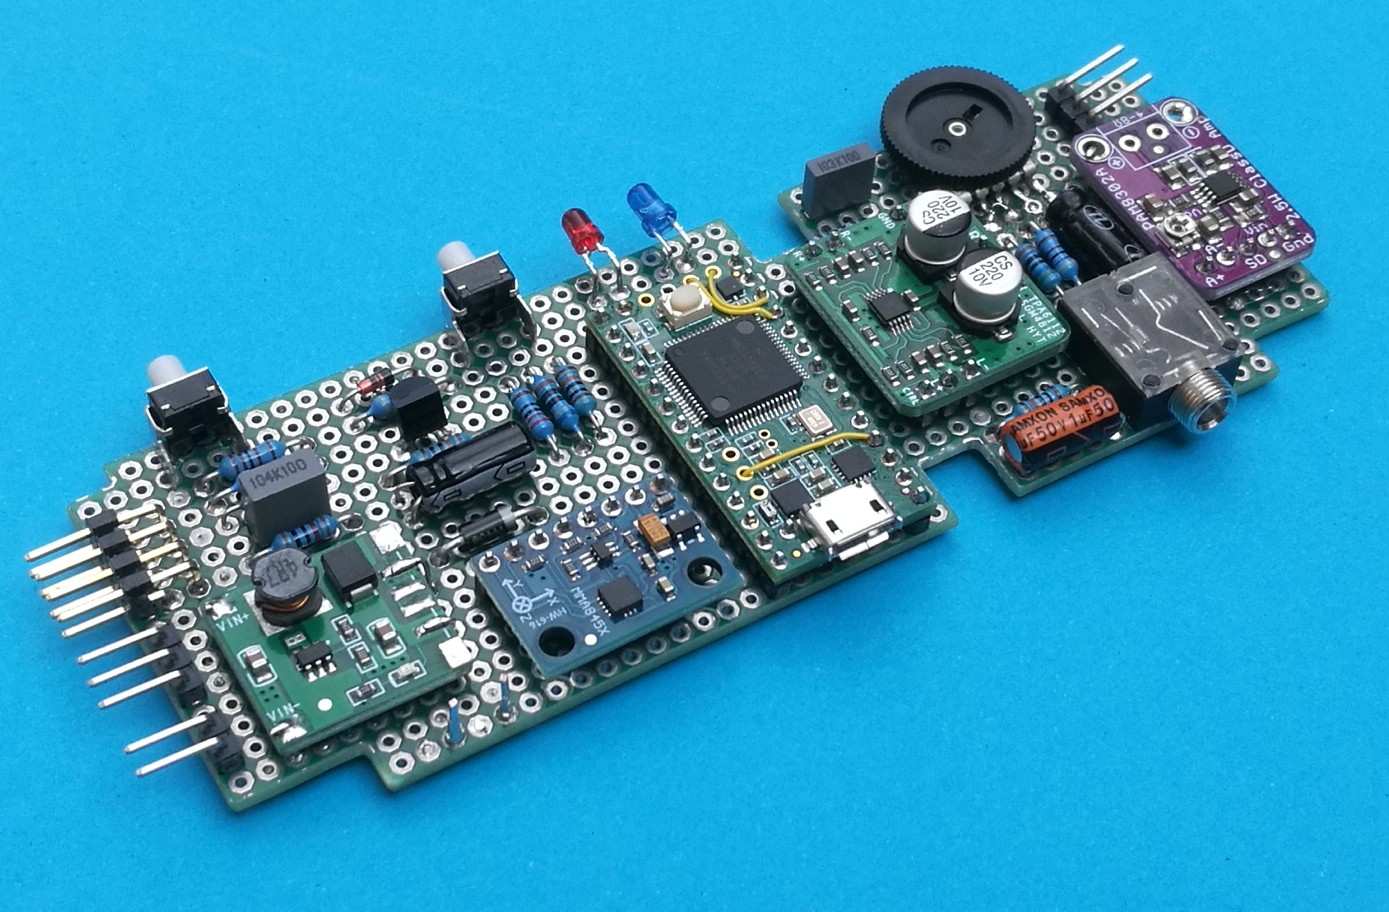
extend the overall range to four octaves. Referring to the Fingering Chart, it can be seen that the fingering combinations cover two octaves, without changing the octave selection by the LH thumb. Selection of notes in the first octave of each range follows quite closely the fingering patterns of the recorder, including C" (Alt.) above the low C'. Contrary to the recorder, the second octave simply repeats the fingering pattern of the first octave, with the top pad (LH1) released, up to G". Above high G", the fingering gets a bit weird, but not as weird as a real recorder. Notes above G" can be avoided, if preferred, simply by changing octaves using the LH thumb (except of course when already in the highest octave range). Electronics Most of the electronics are contained in a few low-cost "breakout" modules mounted on a prototyping board (dot matrix, 120 x 44mm, 0.1" pad spacing). Breakout modules avoid the need to handle and solder ridiculously small surface-mount components and they reduce the complexity of the base board. From left to right in the photo below, the 5 breakout modules are: battery DC-DC boost converter-regulator (5V output), motion sensor (MMA8452 tri-axis accelerometer) for pitch-bend, Teensy 3.2 micro-controller module (Freescale MK20DX256 ARM Cortex M4 CPU, 72MHz), headphone amplifier (TPA6112) and audio power amplifier (PAM8302A class-D, 2.5W rms). All modules except the Teensy 3.2 MCU are available on AliExpress.
Prototype circuit board built on a chunk of "dot-board" measuring 120 x 44 mm Right-angle PCB pin headers are fitted for connection of pressure sensor, OLED display, battery (2 x AA cells), modulation pad (FSR-402 resistive force sensor) and audio output sockets. The touch-pads are wired to Teensy MCU pins on the underside of the board via floating in-line connectors, allowing the board to be completely removed from the enclosure for service if necessary. View/download circuit board schematic Breath Pressure Sensor The pressure sensor is mounted on a separate little board located very close to the mouthpiece. The air inlet port should face away from the mouthpiece, i.e. downward, to prevent moisture from entering the sensor. More details on pressure sensor "plumbing" can be found in the REMI mk2 design notes. The sensor type fitted in the REMI prototype is a MPXV5010-GP, but this part is now expensive (~US$30) and may be hard to obtain. There are other options for the pressure sensor, easier to find and at lower cost. For example, a low-cost pressure sensor with integrated electronics - XGZP6857A - is now available from online suppliers (AliExpress). The device comes in a range of maximum pressure values; 5 kPa is ideal for an EWI breath sensor (part number: XGZP6857A-005). The output voltage is suitable for direct feed to an ADC input. No external signal conditioning required! Supply (Vcc) may be 3.3V or 5V. View/download XGZP6857A data-sheet Whatever your choice of breath sensor, the essential requirement is to produce an output signal of sufficient magnitude to feed into an ADC input on the micro-controller. The ADC input voltage span, i.e. difference between minimum and maximum pressure, should be about 3V ideally, but must be at least 1 volt. The voltage at minimum pressure should be well below 1V. In any case, be sure not to exceed the maximum allowed voltage on the MCU ADC input. |
||
Send email enquiries, suggestions or comments to...
Last revised: March 2024 ___ |